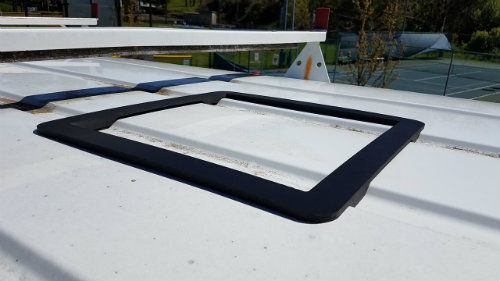
Patent Pending adapter matches the contour of the OEM roof so a standard RV style vent mounts to a flat surface. Prevents distorting the roof sheet metal or vent flange and can be used as an aid for locating the fan. They are CNC machined out of UV and fire resistant expanded PVC. The fan mounts to the outside adapter.
Fits a 14" x 14" opening. Longer screws than came with the vent fan may be needed.
Check out the NEW Airplus vent fan we offer. It has more features than the Maxxair and a brushless motor and it does not rattle! By far the best!! The Fan adapters also work with the Maxxair Deluxe series and the Fan-tastic Vent fans.
The vent adapter outside dimension is 16 3/4 X 16 3/4. If you are using a Maxxair vent our adapter fits the deluxe series, other Maxxair vents have a wider flange. You will need a wider adapter. Please call.
The framing strips are expanded PVC and bonded to the roof with a thick bead of Windoweld. They are more flexible than wood and plenty strong to support the vent and keep it from jiggling. They are essential if the span between the OEM roof beams is more than 18". They also provide a backing for the screws that hold up the vent interior bezel. The longitudinal strips will need to be cut to length for the bay you are installing it in.
Roof Vent Adapter Install Tips
We recommend Sikaflex 221. Locate and cut the 14 x 14 hole. You can use the adapter as a guide to mark the hole. Stay clear of roof support beams.
Make a tape line 1/4" beyond the adapter perimeter. De-gloss the area with a Scotch-brite pad. No need to scuff, just dull the paint. Clean with isopropyl alcohol and let dry thoroughly. Blow dryer if it's wet and/or cold out.
Apply three 1/8" beads of the Sikaflex on the face of the adapter. Then, press the adapter down onto the roof until the adhesive oozes out the sides. It's not necessary to clamp. If you do, use several lightly set clamps and spread out the clamp force over the whole surface area.
Using the adhesive that oozes out, make a fillet around the adapter with a double gloved finger. Pull the tape within 15 minutes. Cure is fast on outside. Let cure overnight and then proceed with the fan install.
If you purchased our Interior Framing Strips, using the hole that you cut locate where the transverse strips need to be placed on the longitudinal strips. Assemble the interior frame with the 2" screws provided. Once the frame is assembled it will be glued to the interior side of the roof using Sikaflex 221. If the strips ordered are not bay specific, then you may need to cut them to the length of the panel you are installing it in.
We recommend using butyl tape for the fan install. Cover the fan flange with 1" wide tape. Place the flange onto the adapter and press down. Then drill pilot holes through the adapter and into the van roof. You may need the 4 longer screws provided for the corners. Tighten all screws very lightly against the fan flange. Some butyl will ooze out which you can trim off.
Coat the fan flange, adapter and onto the roof about 1/2" with self-leveling Dicor or brush-on Flexseal. Some sealants will melt the fan plastic so you might try it on a portion of the interior bezel first. You will cut a lot of that piece off.
Good idea to check the integrity and reapply the sealant every so often.
**Please note, if you purchased butyl tape with this order and the butyl tape is stuck to the plastic, place it in the freezer for 15 or 20 min. It will release, then let it return to room temperature.
The option with butyl tape includes 64" of butyl tape
DISCLAIMER: Owner and/or installer assumes all risks associated with products and/or components purchased from DIYvan. Owner and/or installer recognizes and agrees that this product, and any of its component parts, is sold “as is” and that DIYvan makes no representation or warranty of merchantability that the product is fit for any particular purpose.