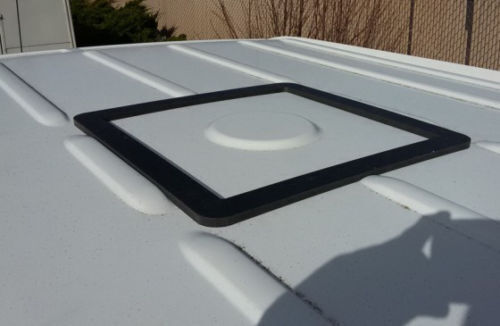
Sprinter NCV3 or VS30 (2007 - present) Roof Vent Adapter for 14" x 14" opening

Sprinter NCV3 or VS30 (2007 - present) Roof Vent Adapter for 14" x 14" opening

Regular price $79.55
/

Suggested Accesories

Sikaflex 221 Adhesive
Sprinter Interior Framing Support System for Fans & AC units with 14" x 14" opening
Maxxair Deluxe vent hold down strips
Insulated Vent Fan Cover, attached with magnets
Dicor Self-Leveling Lap Sealant-10.3 Oz. Tube
WARNING!! Please verify the opening requirement on your Maxxair Fan. If it is 400mm x 400mm you need to purchase an adapter from our Euro Adapter listing.

Fits a 14" x 14" opening, for the Maxxair Deluxe Series Fan and Fantastic Fan.

"Most Forward" or "MF" is further forward than the raised circle 
       NCV3 is 2007 - 2018,   VS30 is 2019 to present
"Front Adapter" fits all Wheel Bases, center on the raised cirlce
"144 Rear Adapter" is for a 144 WB, center of Bay 5
NEW   "144 Most Rear" is for a 144 WB, Rear of Bay 5, the back of the hole is just ahead of the cross member. Note: An inside backing frame will not work with this position. You will want to use our framing support system.
"170 rear" is for the rear of a 170 WB
"170 extended" is for the most rear of a 170 extended WB
"All Rib" is for anywhere along the center with no gap in the ribs


Color of the adapter may be different that what is shown in the photo.


Here are some of the adapter positions on the roof. Sprinter 170
Sprinter 144

New position. 144 Most Rear. 16.25" from the center of the plug.

Patent Pending adapter matches the contour of the OEM roof so a standard RV style vent mounts to a flat surface.  Prevents distorting the roof sheet metal or vent flange and can be used as an aid for locating the fan. They are CNC machined out of UV and fire resistant expanded PVC. The fan mounts to the outside adapter.  Fan adapters work with the Maxxair Deluxe series vent fans. The adapter fits both high and low roofs. If your Maxxair is a 4000K or 4500K please let us know, these fans require a wider adapter.

Longer screws than came with the vent fan may be needed.

The vent adapter outside dimension is 16 3/4 X 16 3/4.   If you are using a Maxxair vent our adapter fits the deluxe series, other Maxxair fan vents have a wider flange. You will need a wider adapter. Please call.

The option with butyl tape includes 64" of tape. If the butyl tape is stuck to the plastic, put it in the freezer for 30 minutes. It will release,  then let the butyl tape return to room temperature.

We can make adapters for offset locations. Please contact us so we can verify size and location.

Roof Vent Adapter Install procedure:
We recommend 3m Window-weld adhesive or Sikaflex 221.  Locate and cut the 14 x 14 hole. You can use the adapter as a guide to mark the hole. Stay clear of roof supports, obviously. Make a tape line 1/4" beyond the adapter perimeter. De-gloss the area with a Scotch- brite pad. No need to scuff. Just dull the paint. Clean with isopropyl alcohol and let dry thoroughly. Blow dryer if it's wet and/or cold out. Apply three 1/8" beads of the Window-weld on the face of the adapter. Then press the adapter down onto the roof until the adhesive oozes out the sides. It's not necessary to clamp. If you do, use a lot of lightly set clamps and spread out the clamp force over the whole surface area. Using the adhesive that oozes out, make a fillet around the adapter with a double gloved finger. Pull the tape within 15 minutes. Cure is fast on outside. Let cure overnight and then proceed with the fan install. We recommend using butyl tape for the fan install. Cover the fan flange with 1 1/8" wide tape. Place onto of adapter and press down. Then drill pilot holes through the adapter and into the van roof. If the screws are going to go into a roof support beam then drill a clearance hole in the beam. You only want the screw to engage the adapter and outer skin. Use a step drill to keep from plunging through the skin. You may need longer screws. Tighten them very lightly against the fan flange. Some butyl will ooze out which you can trim off. Coat the fan flange, adapter and onto the roof about 1/2" with Dicor self leveling sealant or brush on bed-liner or Flexseal from the TV guy works well. Some sealants will melt the fan plastic so you might try it on a portion of the interior bezel first. You'll cut a lot of that piece off. Good idea to check the integrity and reapply the sealant every so often. 

If you have questions about this product you can call Hein at 541-490-5098


Van owner and/or installer assumes all risk associated with roof top mounted items and/or components. Van owner and/or installer recognizes and agrees that this product, and each of its component parts, is sold ?as is? and that seller makes no representation or warranty of merchantability that the product is fit for any particular purpose.