Add To Cart
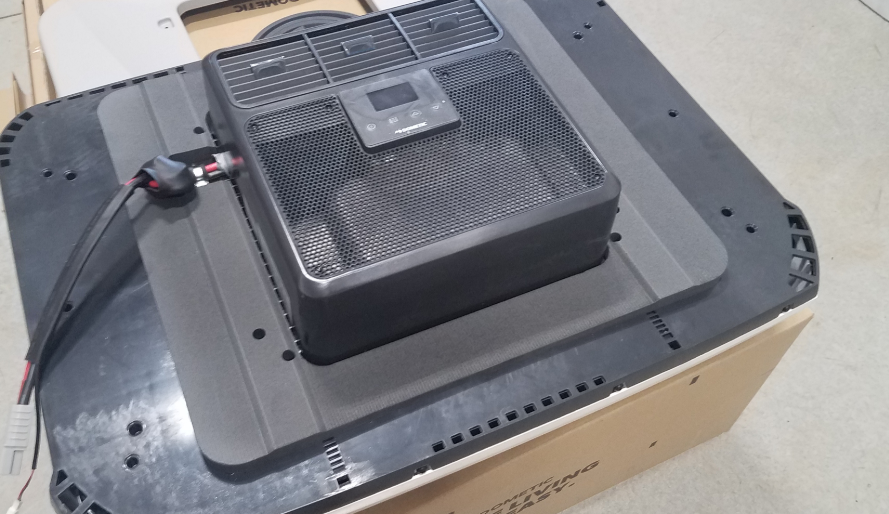
[{"id":44091541979355,"title":"Dometic® CoolAir RTX 2000 Unit only (shipped)","option1":"Dometic® CoolAir RTX 2000 Unit only (shipped)","option2":null,"option3":null,"sku":"9024275","requires_shipping":true,"taxable":true,"featured_image":{"id":39441264967899,"product_id":8014098432219,"position":1,"created_at":"2023-04-20T19:10:44-07:00","updated_at":"2023-05-06T20:56:20-07:00","alt":"Dometic® CoolAir RTX 2000 AC Unit for Vans and DIYvan Installation kit","width":1212,"height":764,"src":"\/\/diyvan.com\/cdn\/shop\/products\/Capture_a1b9663a-f81f-4f29-9daa-0c34cbfc0659.jpg?v=1683431780","variant_ids":[44091541979355,48581401837787]},"available":true,"name":"Dometic® CoolAir RTX 2000 AC Unit for Vans and DIYvan Installation kit - Dometic® CoolAir RTX 2000 Unit only (shipped)","public_title":"Dometic® CoolAir RTX 2000 Unit only (shipped)","options":["Dometic® CoolAir RTX 2000 Unit only (shipped)"],"price":239900,"weight":0,"compare_at_price":null,"inventory_management":"shopify","barcode":null,"featured_media":{"alt":"Dometic® CoolAir RTX 2000 AC Unit for Vans and DIYvan Installation kit","id":32057182847195,"position":1,"preview_image":{"aspect_ratio":1.586,"height":764,"width":1212,"src":"\/\/diyvan.com\/cdn\/shop\/products\/Capture_a1b9663a-f81f-4f29-9daa-0c34cbfc0659.jpg?v=1683431780"}},"requires_selling_plan":false,"selling_plan_allocations":[],"quantity_rule":{"min":1,"max":null,"increment":1}},{"id":48581401837787,"title":"Dometic® CoolAir RTX 2000 Unit only (PICK UP at DIYvan)","option1":"Dometic® CoolAir RTX 2000 Unit only (PICK UP at DIYvan)","option2":null,"option3":null,"sku":null,"requires_shipping":false,"taxable":true,"featured_image":{"id":39441264967899,"product_id":8014098432219,"position":1,"created_at":"2023-04-20T19:10:44-07:00","updated_at":"2023-05-06T20:56:20-07:00","alt":"Dometic® CoolAir RTX 2000 AC Unit for Vans and DIYvan Installation kit","width":1212,"height":764,"src":"\/\/diyvan.com\/cdn\/shop\/products\/Capture_a1b9663a-f81f-4f29-9daa-0c34cbfc0659.jpg?v=1683431780","variant_ids":[44091541979355,48581401837787]},"available":true,"name":"Dometic® CoolAir RTX 2000 AC Unit for Vans and DIYvan Installation kit - Dometic® CoolAir RTX 2000 Unit only (PICK UP at DIYvan)","public_title":"Dometic® CoolAir RTX 2000 Unit only (PICK UP at DIYvan)","options":["Dometic® CoolAir RTX 2000 Unit only (PICK UP at DIYvan)"],"price":220000,"weight":0,"compare_at_price":null,"inventory_management":"shopify","barcode":null,"featured_media":{"alt":"Dometic® CoolAir RTX 2000 AC Unit for Vans and DIYvan Installation kit","id":32057182847195,"position":1,"preview_image":{"aspect_ratio":1.586,"height":764,"width":1212,"src":"\/\/diyvan.com\/cdn\/shop\/products\/Capture_a1b9663a-f81f-4f29-9daa-0c34cbfc0659.jpg?v=1683431780"}},"requires_selling_plan":false,"selling_plan_allocations":[],"quantity_rule":{"min":1,"max":null,"increment":1}},{"id":44066967781595,"title":"DIYvan installation kit with 15ft 4 gauge wire for 12V RTX only","option1":"DIYvan installation kit with 15ft 4 gauge wire for 12V RTX only","option2":null,"option3":null,"sku":"9024216","requires_shipping":true,"taxable":true,"featured_image":{"id":39441265066203,"product_id":8014098432219,"position":2,"created_at":"2023-04-20T19:10:44-07:00","updated_at":"2023-05-06T20:56:20-07:00","alt":"Dometic® CoolAir RTX 2000 AC Unit for Vans and DIYvan Installation kit","width":2606,"height":4000,"src":"\/\/diyvan.com\/cdn\/shop\/products\/20230406_095452_8226c387-6280-4015-a484-459f2646ec54.jpg?v=1683431780","variant_ids":[44066967781595,44066967814363,44066967847131]},"available":true,"name":"Dometic® CoolAir RTX 2000 AC Unit for Vans and DIYvan Installation kit - DIYvan installation kit with 15ft 4 gauge wire for 12V RTX only","public_title":"DIYvan installation kit with 15ft 4 gauge wire for 12V RTX only","options":["DIYvan installation kit with 15ft 4 gauge wire for 12V RTX only"],"price":18600,"weight":3175,"compare_at_price":null,"inventory_management":"shopify","barcode":"custom product","featured_media":{"alt":"Dometic® CoolAir RTX 2000 AC Unit for Vans and DIYvan Installation kit","id":32057182945499,"position":2,"preview_image":{"aspect_ratio":0.652,"height":4000,"width":2606,"src":"\/\/diyvan.com\/cdn\/shop\/products\/20230406_095452_8226c387-6280-4015-a484-459f2646ec54.jpg?v=1683431780"}},"requires_selling_plan":false,"selling_plan_allocations":[],"quantity_rule":{"min":1,"max":null,"increment":1}},{"id":44066967814363,"title":"DIYvan installation kit with 20ft 4 gauge wire for 12V RTX only","option1":"DIYvan installation kit with 20ft 4 gauge wire for 12V RTX only","option2":null,"option3":null,"sku":"9024217","requires_shipping":true,"taxable":true,"featured_image":{"id":39441265066203,"product_id":8014098432219,"position":2,"created_at":"2023-04-20T19:10:44-07:00","updated_at":"2023-05-06T20:56:20-07:00","alt":"Dometic® CoolAir RTX 2000 AC Unit for Vans and DIYvan Installation kit","width":2606,"height":4000,"src":"\/\/diyvan.com\/cdn\/shop\/products\/20230406_095452_8226c387-6280-4015-a484-459f2646ec54.jpg?v=1683431780","variant_ids":[44066967781595,44066967814363,44066967847131]},"available":true,"name":"Dometic® CoolAir RTX 2000 AC Unit for Vans and DIYvan Installation kit - DIYvan installation kit with 20ft 4 gauge wire for 12V RTX only","public_title":"DIYvan installation kit with 20ft 4 gauge wire for 12V RTX only","options":["DIYvan installation kit with 20ft 4 gauge wire for 12V RTX only"],"price":22400,"weight":3629,"compare_at_price":null,"inventory_management":"shopify","barcode":"custom product","featured_media":{"alt":"Dometic® CoolAir RTX 2000 AC Unit for Vans and DIYvan Installation kit","id":32057182945499,"position":2,"preview_image":{"aspect_ratio":0.652,"height":4000,"width":2606,"src":"\/\/diyvan.com\/cdn\/shop\/products\/20230406_095452_8226c387-6280-4015-a484-459f2646ec54.jpg?v=1683431780"}},"requires_selling_plan":false,"selling_plan_allocations":[],"quantity_rule":{"min":1,"max":null,"increment":1}},{"id":44066967847131,"title":"DIYvan installation kit with 25ft 4 gauge wire for 12V RTX only","option1":"DIYvan installation kit with 25ft 4 gauge wire for 12V RTX only","option2":null,"option3":null,"sku":"9024218","requires_shipping":true,"taxable":true,"featured_image":{"id":39441265066203,"product_id":8014098432219,"position":2,"created_at":"2023-04-20T19:10:44-07:00","updated_at":"2023-05-06T20:56:20-07:00","alt":"Dometic® CoolAir RTX 2000 AC Unit for Vans and DIYvan Installation kit","width":2606,"height":4000,"src":"\/\/diyvan.com\/cdn\/shop\/products\/20230406_095452_8226c387-6280-4015-a484-459f2646ec54.jpg?v=1683431780","variant_ids":[44066967781595,44066967814363,44066967847131]},"available":true,"name":"Dometic® CoolAir RTX 2000 AC Unit for Vans and DIYvan Installation kit - DIYvan installation kit with 25ft 4 gauge wire for 12V RTX only","public_title":"DIYvan installation kit with 25ft 4 gauge wire for 12V RTX only","options":["DIYvan installation kit with 25ft 4 gauge wire for 12V RTX only"],"price":26300,"weight":0,"compare_at_price":null,"inventory_management":"shopify","barcode":"custom product","featured_media":{"alt":"Dometic® CoolAir RTX 2000 AC Unit for Vans and DIYvan Installation kit","id":32057182945499,"position":2,"preview_image":{"aspect_ratio":0.652,"height":4000,"width":2606,"src":"\/\/diyvan.com\/cdn\/shop\/products\/20230406_095452_8226c387-6280-4015-a484-459f2646ec54.jpg?v=1683431780"}},"requires_selling_plan":false,"selling_plan_allocations":[],"quantity_rule":{"min":1,"max":null,"increment":1}},{"id":44066967879899,"title":"DIYvan installation kit (no wire) for 12V RTX only","option1":"DIYvan installation kit (no wire) for 12V RTX only","option2":null,"option3":null,"sku":"9024160","requires_shipping":true,"taxable":true,"featured_image":{"id":39441265098971,"product_id":8014098432219,"position":3,"created_at":"2023-04-20T19:10:44-07:00","updated_at":"2023-05-06T20:56:20-07:00","alt":"Dometic® CoolAir RTX 2000 AC Unit for Vans and DIYvan Installation kit","width":3000,"height":4000,"src":"\/\/diyvan.com\/cdn\/shop\/products\/20230328_144747_5b1940e1-60d3-4ef6-912f-ca89983b5362.jpg?v=1683431780","variant_ids":[44066967879899]},"available":true,"name":"Dometic® CoolAir RTX 2000 AC Unit for Vans and DIYvan Installation kit - DIYvan installation kit (no wire) for 12V RTX only","public_title":"DIYvan installation kit (no wire) for 12V RTX only","options":["DIYvan installation kit (no wire) for 12V RTX only"],"price":6000,"weight":0,"compare_at_price":null,"inventory_management":"shopify","barcode":"custom product","featured_media":{"alt":"Dometic® CoolAir RTX 2000 AC Unit for Vans and DIYvan Installation kit","id":32057182978267,"position":3,"preview_image":{"aspect_ratio":0.75,"height":4000,"width":3000,"src":"\/\/diyvan.com\/cdn\/shop\/products\/20230328_144747_5b1940e1-60d3-4ef6-912f-ca89983b5362.jpg?v=1683431780"}},"requires_selling_plan":false,"selling_plan_allocations":[],"quantity_rule":{"min":1,"max":null,"increment":1}},{"id":44429187547355,"title":"DIYvan M8 Stud kit w\/inserts (no anderson plug or wire)","option1":"DIYvan M8 Stud kit w\/inserts (no anderson plug or wire)","option2":null,"option3":null,"sku":"9024573","requires_shipping":true,"taxable":true,"featured_image":{"id":43933767860443,"product_id":8014098432219,"position":9,"created_at":"2025-01-15T12:46:18-08:00","updated_at":"2025-01-15T12:46:18-08:00","alt":"Dometic® CoolAir RTX 2000 AC Unit for Vans and DIYvan Installation kit","width":247,"height":352,"src":"\/\/diyvan.com\/cdn\/shop\/files\/Screenshot2025-01-15120538.png?v=1736973978","variant_ids":[44429187547355]},"available":true,"name":"Dometic® CoolAir RTX 2000 AC Unit for Vans and DIYvan Installation kit - DIYvan M8 Stud kit w\/inserts (no anderson plug or wire)","public_title":"DIYvan M8 Stud kit w\/inserts (no anderson plug or wire)","options":["DIYvan M8 Stud kit w\/inserts (no anderson plug or wire)"],"price":4600,"weight":200,"compare_at_price":null,"inventory_management":"shopify","barcode":"custom product","featured_media":{"alt":"Dometic® CoolAir RTX 2000 AC Unit for Vans and DIYvan Installation kit","id":35833449971931,"position":9,"preview_image":{"aspect_ratio":0.702,"height":352,"width":247,"src":"\/\/diyvan.com\/cdn\/shop\/files\/Screenshot2025-01-15120538.png?v=1736973978"}},"requires_selling_plan":false,"selling_plan_allocations":[],"quantity_rule":{"min":1,"max":null,"increment":1}},{"id":46233769279707,"title":"Interior Bezel - Black","option1":"Interior Bezel - Black","option2":null,"option3":null,"sku":"9022679","requires_shipping":true,"taxable":true,"featured_image":{"id":43372500517083,"product_id":8014098432219,"position":7,"created_at":"2024-11-06T12:44:24-08:00","updated_at":"2024-11-06T12:44:24-08:00","alt":"Dometic RTX 2000 Air Conditioner Adapter for Ford Transit Low Roof","width":1530,"height":1552,"src":"\/\/diyvan.com\/cdn\/shop\/files\/blackbezel.jpg?v=1730925864","variant_ids":[46233769279707]},"available":true,"name":"Dometic® CoolAir RTX 2000 AC Unit for Vans and DIYvan Installation kit - Interior Bezel - Black","public_title":"Interior Bezel - Black","options":["Interior Bezel - Black"],"price":9009,"weight":907,"compare_at_price":null,"inventory_management":"shopify","barcode":"Custom Product","featured_media":{"alt":"Dometic RTX 2000 Air Conditioner Adapter for Ford Transit Low Roof","id":35479936532699,"position":7,"preview_image":{"aspect_ratio":0.986,"height":1552,"width":1530,"src":"\/\/diyvan.com\/cdn\/shop\/files\/blackbezel.jpg?v=1730925864"}},"requires_selling_plan":false,"selling_plan_allocations":[],"quantity_rule":{"min":1,"max":null,"increment":1}},{"id":46233772523739,"title":"Interior Bezel - White","option1":"Interior Bezel - White","option2":null,"option3":null,"sku":"9023478","requires_shipping":true,"taxable":true,"featured_image":{"id":43372501663963,"product_id":8014098432219,"position":8,"created_at":"2024-11-06T12:44:35-08:00","updated_at":"2024-11-06T12:44:35-08:00","alt":"Dometic RTX 2000 Air Conditioner Adapter for Ford Transit Low Roof","width":2021,"height":1948,"src":"\/\/diyvan.com\/cdn\/shop\/files\/whitebezel.jpg?v=1730925875","variant_ids":[46233772523739]},"available":true,"name":"Dometic® CoolAir RTX 2000 AC Unit for Vans and DIYvan Installation kit - Interior Bezel - White","public_title":"Interior Bezel - White","options":["Interior Bezel - White"],"price":9009,"weight":0,"compare_at_price":null,"inventory_management":"shopify","barcode":"Custom Product","featured_media":{"alt":"Dometic RTX 2000 Air Conditioner Adapter for Ford Transit Low Roof","id":35479937253595,"position":8,"preview_image":{"aspect_ratio":1.037,"height":1948,"width":2021,"src":"\/\/diyvan.com\/cdn\/shop\/files\/whitebezel.jpg?v=1730925875"}},"requires_selling_plan":false,"selling_plan_allocations":[],"quantity_rule":{"min":1,"max":null,"increment":1}},{"id":46233774063835,"title":"Interior Bezel - Grey","option1":"Interior Bezel - Grey","option2":null,"option3":null,"sku":"9022677","requires_shipping":true,"taxable":true,"featured_image":{"id":43372499206363,"product_id":8014098432219,"position":6,"created_at":"2024-11-06T12:44:12-08:00","updated_at":"2024-11-06T12:44:12-08:00","alt":"Dometic RTX 2000 Air Conditioner Adapter for Ford Transit Low Roof","width":1607,"height":1747,"src":"\/\/diyvan.com\/cdn\/shop\/files\/greybezel.jpg?v=1730925852","variant_ids":[46233774063835]},"available":true,"name":"Dometic® CoolAir RTX 2000 AC Unit for Vans and DIYvan Installation kit - Interior Bezel - Grey","public_title":"Interior Bezel - Grey","options":["Interior Bezel - Grey"],"price":9009,"weight":454,"compare_at_price":null,"inventory_management":"shopify","barcode":"Custom Product","featured_media":{"alt":"Dometic RTX 2000 Air Conditioner Adapter for Ford Transit Low Roof","id":35479935615195,"position":6,"preview_image":{"aspect_ratio":0.92,"height":1747,"width":1607,"src":"\/\/diyvan.com\/cdn\/shop\/files\/greybezel.jpg?v=1730925852"}},"requires_selling_plan":false,"selling_plan_allocations":[],"quantity_rule":{"min":1,"max":null,"increment":1}},{"id":46453584429275,"title":"1\/2\" Foam Seal","option1":"1\/2\" Foam Seal","option2":null,"option3":null,"sku":"9022658","requires_shipping":true,"taxable":true,"featured_image":{"id":44085954969819,"product_id":8014098432219,"position":10,"created_at":"2025-01-27T16:37:45-08:00","updated_at":"2025-01-27T16:37:47-08:00","alt":"Dometic® CoolAir RTX 2000 AC Unit for Vans and DIYvan Installation kit","width":1205,"height":549,"src":"\/\/diyvan.com\/cdn\/shop\/files\/Screenshot_2025-01-27_163720.png?v=1738024667","variant_ids":[46453584429275]},"available":true,"name":"Dometic® CoolAir RTX 2000 AC Unit for Vans and DIYvan Installation kit - 1\/2\" Foam Seal","public_title":"1\/2\" Foam Seal","options":["1\/2\" Foam Seal"],"price":5775,"weight":181,"compare_at_price":null,"inventory_management":"shopify","barcode":"does not apply","featured_media":{"alt":"Dometic® CoolAir RTX 2000 AC Unit for Vans and DIYvan Installation kit","id":35925470052571,"position":10,"preview_image":{"aspect_ratio":2.195,"height":549,"width":1205,"src":"\/\/diyvan.com\/cdn\/shop\/files\/Screenshot_2025-01-27_163720.png?v=1738024667"}},"requires_selling_plan":false,"selling_plan_allocations":[],"quantity_rule":{"min":1,"max":null,"increment":1}}]