136 wheel base, Bay 1
136 wheel base, Bay 2
136 wheel base, Bay 3
136 wheel base, Bay 4
159 wheel base, Bay 1
159 wheel base, Bay 2
159 wheel base, Bay 3
159 wheel base, Bay 4
159 wheel base, Bay 6
159 Extended, Bay 1
159 Extended, Bay 2
159 Extended, Bay 3
159 Extended, Bay 4
159 Extended, Bay 6
159 Extended, Bay 7
Add To Cart
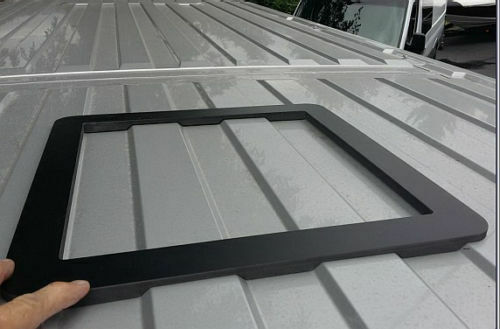
[{"id":45741418938587,"title":"136 wheel base, Bay 1","option1":"136 wheel base, Bay 1","option2":null,"option3":null,"sku":"9024434","requires_shipping":true,"taxable":true,"featured_image":{"id":42568350957787,"product_id":8585810968795,"position":2,"created_at":"2024-09-06T12:03:16-07:00","updated_at":"2024-09-06T12:03:17-07:00","alt":"Promaster Interior Framing Support System for Fans or AC units","width":1320,"height":1020,"src":"\/\/diyvan.com\/cdn\/shop\/files\/136_ROOF_WITH_BEAMS.png?v=1725649397","variant_ids":[45741418938587,45741418971355,45741419004123,45741419036891]},"available":true,"name":"Promaster High Roof Interior Framing Support System for Vent Fans - 136 wheel base, Bay 1","public_title":"136 wheel base, Bay 1","options":["136 wheel base, Bay 1"],"price":8500,"weight":1361,"compare_at_price":null,"inventory_management":"shopify","barcode":"Does not apply","featured_media":{"alt":"Promaster Interior Framing Support System for Fans or AC units","id":34993693098203,"position":2,"preview_image":{"aspect_ratio":1.294,"height":1020,"width":1320,"src":"\/\/diyvan.com\/cdn\/shop\/files\/136_ROOF_WITH_BEAMS.png?v=1725649397"}},"requires_selling_plan":false,"selling_plan_allocations":[],"quantity_rule":{"min":1,"max":null,"increment":1}},{"id":45741418971355,"title":"136 wheel base, Bay 2","option1":"136 wheel base, Bay 2","option2":null,"option3":null,"sku":"9024435","requires_shipping":true,"taxable":true,"featured_image":{"id":42568350957787,"product_id":8585810968795,"position":2,"created_at":"2024-09-06T12:03:16-07:00","updated_at":"2024-09-06T12:03:17-07:00","alt":"Promaster Interior Framing Support System for Fans or AC units","width":1320,"height":1020,"src":"\/\/diyvan.com\/cdn\/shop\/files\/136_ROOF_WITH_BEAMS.png?v=1725649397","variant_ids":[45741418938587,45741418971355,45741419004123,45741419036891]},"available":true,"name":"Promaster High Roof Interior Framing Support System for Vent Fans - 136 wheel base, Bay 2","public_title":"136 wheel base, Bay 2","options":["136 wheel base, Bay 2"],"price":8500,"weight":1361,"compare_at_price":null,"inventory_management":"shopify","barcode":"Does not apply","featured_media":{"alt":"Promaster Interior Framing Support System for Fans or AC units","id":34993693098203,"position":2,"preview_image":{"aspect_ratio":1.294,"height":1020,"width":1320,"src":"\/\/diyvan.com\/cdn\/shop\/files\/136_ROOF_WITH_BEAMS.png?v=1725649397"}},"requires_selling_plan":false,"selling_plan_allocations":[],"quantity_rule":{"min":1,"max":null,"increment":1}},{"id":45741419004123,"title":"136 wheel base, Bay 3","option1":"136 wheel base, Bay 3","option2":null,"option3":null,"sku":"9024436","requires_shipping":true,"taxable":true,"featured_image":{"id":42568350957787,"product_id":8585810968795,"position":2,"created_at":"2024-09-06T12:03:16-07:00","updated_at":"2024-09-06T12:03:17-07:00","alt":"Promaster Interior Framing Support System for Fans or AC units","width":1320,"height":1020,"src":"\/\/diyvan.com\/cdn\/shop\/files\/136_ROOF_WITH_BEAMS.png?v=1725649397","variant_ids":[45741418938587,45741418971355,45741419004123,45741419036891]},"available":true,"name":"Promaster High Roof Interior Framing Support System for Vent Fans - 136 wheel base, Bay 3","public_title":"136 wheel base, Bay 3","options":["136 wheel base, Bay 3"],"price":8500,"weight":1361,"compare_at_price":null,"inventory_management":"shopify","barcode":"Does not apply","featured_media":{"alt":"Promaster Interior Framing Support System for Fans or AC units","id":34993693098203,"position":2,"preview_image":{"aspect_ratio":1.294,"height":1020,"width":1320,"src":"\/\/diyvan.com\/cdn\/shop\/files\/136_ROOF_WITH_BEAMS.png?v=1725649397"}},"requires_selling_plan":false,"selling_plan_allocations":[],"quantity_rule":{"min":1,"max":null,"increment":1}},{"id":45741419036891,"title":"136 wheel base, Bay 4","option1":"136 wheel base, Bay 4","option2":null,"option3":null,"sku":"9024437","requires_shipping":true,"taxable":true,"featured_image":{"id":42568350957787,"product_id":8585810968795,"position":2,"created_at":"2024-09-06T12:03:16-07:00","updated_at":"2024-09-06T12:03:17-07:00","alt":"Promaster Interior Framing Support System for Fans or AC units","width":1320,"height":1020,"src":"\/\/diyvan.com\/cdn\/shop\/files\/136_ROOF_WITH_BEAMS.png?v=1725649397","variant_ids":[45741418938587,45741418971355,45741419004123,45741419036891]},"available":true,"name":"Promaster High Roof Interior Framing Support System for Vent Fans - 136 wheel base, Bay 4","public_title":"136 wheel base, Bay 4","options":["136 wheel base, Bay 4"],"price":8500,"weight":1361,"compare_at_price":null,"inventory_management":"shopify","barcode":"Does not apply","featured_media":{"alt":"Promaster Interior Framing Support System for Fans or AC units","id":34993693098203,"position":2,"preview_image":{"aspect_ratio":1.294,"height":1020,"width":1320,"src":"\/\/diyvan.com\/cdn\/shop\/files\/136_ROOF_WITH_BEAMS.png?v=1725649397"}},"requires_selling_plan":false,"selling_plan_allocations":[],"quantity_rule":{"min":1,"max":null,"increment":1}},{"id":45741419069659,"title":"159 wheel base, Bay 1","option1":"159 wheel base, Bay 1","option2":null,"option3":null,"sku":"9024424","requires_shipping":true,"taxable":true,"featured_image":{"id":42568950350043,"product_id":8585810968795,"position":4,"created_at":"2024-09-06T14:25:07-07:00","updated_at":"2024-09-06T14:25:08-07:00","alt":"Promaster Interior Framing Support System for Fans or AC units","width":1320,"height":1020,"src":"\/\/diyvan.com\/cdn\/shop\/files\/159_ROOF_WITH_BEAMS.png?v=1725657908","variant_ids":[45741419069659,45741419102427,45741419135195,45741419167963,45741419200731]},"available":true,"name":"Promaster High Roof Interior Framing Support System for Vent Fans - 159 wheel base, Bay 1","public_title":"159 wheel base, Bay 1","options":["159 wheel base, Bay 1"],"price":8500,"weight":1361,"compare_at_price":null,"inventory_management":"shopify","barcode":"Does not apply","featured_media":{"alt":"Promaster Interior Framing Support System for Fans or AC units","id":34994175279323,"position":4,"preview_image":{"aspect_ratio":1.294,"height":1020,"width":1320,"src":"\/\/diyvan.com\/cdn\/shop\/files\/159_ROOF_WITH_BEAMS.png?v=1725657908"}},"requires_selling_plan":false,"selling_plan_allocations":[],"quantity_rule":{"min":1,"max":null,"increment":1}},{"id":45741419102427,"title":"159 wheel base, Bay 2","option1":"159 wheel base, Bay 2","option2":null,"option3":null,"sku":"9024425","requires_shipping":true,"taxable":true,"featured_image":{"id":42568950350043,"product_id":8585810968795,"position":4,"created_at":"2024-09-06T14:25:07-07:00","updated_at":"2024-09-06T14:25:08-07:00","alt":"Promaster Interior Framing Support System for Fans or AC units","width":1320,"height":1020,"src":"\/\/diyvan.com\/cdn\/shop\/files\/159_ROOF_WITH_BEAMS.png?v=1725657908","variant_ids":[45741419069659,45741419102427,45741419135195,45741419167963,45741419200731]},"available":true,"name":"Promaster High Roof Interior Framing Support System for Vent Fans - 159 wheel base, Bay 2","public_title":"159 wheel base, Bay 2","options":["159 wheel base, Bay 2"],"price":8500,"weight":1361,"compare_at_price":null,"inventory_management":"shopify","barcode":"Does not apply","featured_media":{"alt":"Promaster Interior Framing Support System for Fans or AC units","id":34994175279323,"position":4,"preview_image":{"aspect_ratio":1.294,"height":1020,"width":1320,"src":"\/\/diyvan.com\/cdn\/shop\/files\/159_ROOF_WITH_BEAMS.png?v=1725657908"}},"requires_selling_plan":false,"selling_plan_allocations":[],"quantity_rule":{"min":1,"max":null,"increment":1}},{"id":45741419135195,"title":"159 wheel base, Bay 3","option1":"159 wheel base, Bay 3","option2":null,"option3":null,"sku":"9024426","requires_shipping":true,"taxable":true,"featured_image":{"id":42568950350043,"product_id":8585810968795,"position":4,"created_at":"2024-09-06T14:25:07-07:00","updated_at":"2024-09-06T14:25:08-07:00","alt":"Promaster Interior Framing Support System for Fans or AC units","width":1320,"height":1020,"src":"\/\/diyvan.com\/cdn\/shop\/files\/159_ROOF_WITH_BEAMS.png?v=1725657908","variant_ids":[45741419069659,45741419102427,45741419135195,45741419167963,45741419200731]},"available":true,"name":"Promaster High Roof Interior Framing Support System for Vent Fans - 159 wheel base, Bay 3","public_title":"159 wheel base, Bay 3","options":["159 wheel base, Bay 3"],"price":8500,"weight":1361,"compare_at_price":null,"inventory_management":"shopify","barcode":"Does not apply","featured_media":{"alt":"Promaster Interior Framing Support System for Fans or AC units","id":34994175279323,"position":4,"preview_image":{"aspect_ratio":1.294,"height":1020,"width":1320,"src":"\/\/diyvan.com\/cdn\/shop\/files\/159_ROOF_WITH_BEAMS.png?v=1725657908"}},"requires_selling_plan":false,"selling_plan_allocations":[],"quantity_rule":{"min":1,"max":null,"increment":1}},{"id":45741419167963,"title":"159 wheel base, Bay 4","option1":"159 wheel base, Bay 4","option2":null,"option3":null,"sku":"9024427","requires_shipping":true,"taxable":true,"featured_image":{"id":42568950350043,"product_id":8585810968795,"position":4,"created_at":"2024-09-06T14:25:07-07:00","updated_at":"2024-09-06T14:25:08-07:00","alt":"Promaster Interior Framing Support System for Fans or AC units","width":1320,"height":1020,"src":"\/\/diyvan.com\/cdn\/shop\/files\/159_ROOF_WITH_BEAMS.png?v=1725657908","variant_ids":[45741419069659,45741419102427,45741419135195,45741419167963,45741419200731]},"available":true,"name":"Promaster High Roof Interior Framing Support System for Vent Fans - 159 wheel base, Bay 4","public_title":"159 wheel base, Bay 4","options":["159 wheel base, Bay 4"],"price":8500,"weight":1361,"compare_at_price":null,"inventory_management":"shopify","barcode":"Does not apply","featured_media":{"alt":"Promaster Interior Framing Support System for Fans or AC units","id":34994175279323,"position":4,"preview_image":{"aspect_ratio":1.294,"height":1020,"width":1320,"src":"\/\/diyvan.com\/cdn\/shop\/files\/159_ROOF_WITH_BEAMS.png?v=1725657908"}},"requires_selling_plan":false,"selling_plan_allocations":[],"quantity_rule":{"min":1,"max":null,"increment":1}},{"id":45741419200731,"title":"159 wheel base, Bay 6","option1":"159 wheel base, Bay 6","option2":null,"option3":null,"sku":"9024428","requires_shipping":true,"taxable":true,"featured_image":{"id":42568950350043,"product_id":8585810968795,"position":4,"created_at":"2024-09-06T14:25:07-07:00","updated_at":"2024-09-06T14:25:08-07:00","alt":"Promaster Interior Framing Support System for Fans or AC units","width":1320,"height":1020,"src":"\/\/diyvan.com\/cdn\/shop\/files\/159_ROOF_WITH_BEAMS.png?v=1725657908","variant_ids":[45741419069659,45741419102427,45741419135195,45741419167963,45741419200731]},"available":true,"name":"Promaster High Roof Interior Framing Support System for Vent Fans - 159 wheel base, Bay 6","public_title":"159 wheel base, Bay 6","options":["159 wheel base, Bay 6"],"price":8500,"weight":1361,"compare_at_price":null,"inventory_management":"shopify","barcode":"Does not apply","featured_media":{"alt":"Promaster Interior Framing Support System for Fans or AC units","id":34994175279323,"position":4,"preview_image":{"aspect_ratio":1.294,"height":1020,"width":1320,"src":"\/\/diyvan.com\/cdn\/shop\/files\/159_ROOF_WITH_BEAMS.png?v=1725657908"}},"requires_selling_plan":false,"selling_plan_allocations":[],"quantity_rule":{"min":1,"max":null,"increment":1}},{"id":45741419233499,"title":"159 Extended, Bay 1","option1":"159 Extended, Bay 1","option2":null,"option3":null,"sku":"9024997","requires_shipping":true,"taxable":true,"featured_image":{"id":41544684994779,"product_id":8585810968795,"position":1,"created_at":"2024-06-16T14:37:19-07:00","updated_at":"2024-06-26T17:06:06-07:00","alt":"Promaster Interior Framing Support System for Fans or AC units","width":1250,"height":741,"src":"\/\/diyvan.com\/cdn\/shop\/files\/57_a205aeda-176c-4c84-aa43-a57bba8846b2.jpg?v=1719446766","variant_ids":[45741419233499,45741419266267,45741419299035,45741419331803,45741419364571,45741419397339]},"available":true,"name":"Promaster High Roof Interior Framing Support System for Vent Fans - 159 Extended, Bay 1","public_title":"159 Extended, Bay 1","options":["159 Extended, Bay 1"],"price":8500,"weight":1361,"compare_at_price":null,"inventory_management":"shopify","barcode":"Does not apply","featured_media":{"alt":"Promaster Interior Framing Support System for Fans or AC units","id":34265351160027,"position":1,"preview_image":{"aspect_ratio":1.687,"height":741,"width":1250,"src":"\/\/diyvan.com\/cdn\/shop\/files\/57_a205aeda-176c-4c84-aa43-a57bba8846b2.jpg?v=1719446766"}},"requires_selling_plan":false,"selling_plan_allocations":[],"quantity_rule":{"min":1,"max":null,"increment":1}},{"id":45741419266267,"title":"159 Extended, Bay 2","option1":"159 Extended, Bay 2","option2":null,"option3":null,"sku":"9024998","requires_shipping":true,"taxable":true,"featured_image":{"id":41544684994779,"product_id":8585810968795,"position":1,"created_at":"2024-06-16T14:37:19-07:00","updated_at":"2024-06-26T17:06:06-07:00","alt":"Promaster Interior Framing Support System for Fans or AC units","width":1250,"height":741,"src":"\/\/diyvan.com\/cdn\/shop\/files\/57_a205aeda-176c-4c84-aa43-a57bba8846b2.jpg?v=1719446766","variant_ids":[45741419233499,45741419266267,45741419299035,45741419331803,45741419364571,45741419397339]},"available":true,"name":"Promaster High Roof Interior Framing Support System for Vent Fans - 159 Extended, Bay 2","public_title":"159 Extended, Bay 2","options":["159 Extended, Bay 2"],"price":8500,"weight":1361,"compare_at_price":null,"inventory_management":"shopify","barcode":"Does not apply","featured_media":{"alt":"Promaster Interior Framing Support System for Fans or AC units","id":34265351160027,"position":1,"preview_image":{"aspect_ratio":1.687,"height":741,"width":1250,"src":"\/\/diyvan.com\/cdn\/shop\/files\/57_a205aeda-176c-4c84-aa43-a57bba8846b2.jpg?v=1719446766"}},"requires_selling_plan":false,"selling_plan_allocations":[],"quantity_rule":{"min":1,"max":null,"increment":1}},{"id":45741419299035,"title":"159 Extended, Bay 3","option1":"159 Extended, Bay 3","option2":null,"option3":null,"sku":"9024999","requires_shipping":true,"taxable":true,"featured_image":{"id":41544684994779,"product_id":8585810968795,"position":1,"created_at":"2024-06-16T14:37:19-07:00","updated_at":"2024-06-26T17:06:06-07:00","alt":"Promaster Interior Framing Support System for Fans or AC units","width":1250,"height":741,"src":"\/\/diyvan.com\/cdn\/shop\/files\/57_a205aeda-176c-4c84-aa43-a57bba8846b2.jpg?v=1719446766","variant_ids":[45741419233499,45741419266267,45741419299035,45741419331803,45741419364571,45741419397339]},"available":true,"name":"Promaster High Roof Interior Framing Support System for Vent Fans - 159 Extended, Bay 3","public_title":"159 Extended, Bay 3","options":["159 Extended, Bay 3"],"price":8500,"weight":1361,"compare_at_price":null,"inventory_management":"shopify","barcode":"Does not apply","featured_media":{"alt":"Promaster Interior Framing Support System for Fans or AC units","id":34265351160027,"position":1,"preview_image":{"aspect_ratio":1.687,"height":741,"width":1250,"src":"\/\/diyvan.com\/cdn\/shop\/files\/57_a205aeda-176c-4c84-aa43-a57bba8846b2.jpg?v=1719446766"}},"requires_selling_plan":false,"selling_plan_allocations":[],"quantity_rule":{"min":1,"max":null,"increment":1}},{"id":45741419331803,"title":"159 Extended, Bay 4","option1":"159 Extended, Bay 4","option2":null,"option3":null,"sku":"9025000","requires_shipping":true,"taxable":true,"featured_image":{"id":41544684994779,"product_id":8585810968795,"position":1,"created_at":"2024-06-16T14:37:19-07:00","updated_at":"2024-06-26T17:06:06-07:00","alt":"Promaster Interior Framing Support System for Fans or AC units","width":1250,"height":741,"src":"\/\/diyvan.com\/cdn\/shop\/files\/57_a205aeda-176c-4c84-aa43-a57bba8846b2.jpg?v=1719446766","variant_ids":[45741419233499,45741419266267,45741419299035,45741419331803,45741419364571,45741419397339]},"available":true,"name":"Promaster High Roof Interior Framing Support System for Vent Fans - 159 Extended, Bay 4","public_title":"159 Extended, Bay 4","options":["159 Extended, Bay 4"],"price":8500,"weight":1361,"compare_at_price":null,"inventory_management":"shopify","barcode":"Does not apply","featured_media":{"alt":"Promaster Interior Framing Support System for Fans or AC units","id":34265351160027,"position":1,"preview_image":{"aspect_ratio":1.687,"height":741,"width":1250,"src":"\/\/diyvan.com\/cdn\/shop\/files\/57_a205aeda-176c-4c84-aa43-a57bba8846b2.jpg?v=1719446766"}},"requires_selling_plan":false,"selling_plan_allocations":[],"quantity_rule":{"min":1,"max":null,"increment":1}},{"id":45741419364571,"title":"159 Extended, Bay 6","option1":"159 Extended, Bay 6","option2":null,"option3":null,"sku":"9024987","requires_shipping":true,"taxable":true,"featured_image":{"id":41544684994779,"product_id":8585810968795,"position":1,"created_at":"2024-06-16T14:37:19-07:00","updated_at":"2024-06-26T17:06:06-07:00","alt":"Promaster Interior Framing Support System for Fans or AC units","width":1250,"height":741,"src":"\/\/diyvan.com\/cdn\/shop\/files\/57_a205aeda-176c-4c84-aa43-a57bba8846b2.jpg?v=1719446766","variant_ids":[45741419233499,45741419266267,45741419299035,45741419331803,45741419364571,45741419397339]},"available":true,"name":"Promaster High Roof Interior Framing Support System for Vent Fans - 159 Extended, Bay 6","public_title":"159 Extended, Bay 6","options":["159 Extended, Bay 6"],"price":8500,"weight":1361,"compare_at_price":null,"inventory_management":"shopify","barcode":"Does not apply","featured_media":{"alt":"Promaster Interior Framing Support System for Fans or AC units","id":34265351160027,"position":1,"preview_image":{"aspect_ratio":1.687,"height":741,"width":1250,"src":"\/\/diyvan.com\/cdn\/shop\/files\/57_a205aeda-176c-4c84-aa43-a57bba8846b2.jpg?v=1719446766"}},"requires_selling_plan":false,"selling_plan_allocations":[],"quantity_rule":{"min":1,"max":null,"increment":1}},{"id":45741419397339,"title":"159 Extended, Bay 7","option1":"159 Extended, Bay 7","option2":null,"option3":null,"sku":"9024988","requires_shipping":true,"taxable":true,"featured_image":{"id":41544684994779,"product_id":8585810968795,"position":1,"created_at":"2024-06-16T14:37:19-07:00","updated_at":"2024-06-26T17:06:06-07:00","alt":"Promaster Interior Framing Support System for Fans or AC units","width":1250,"height":741,"src":"\/\/diyvan.com\/cdn\/shop\/files\/57_a205aeda-176c-4c84-aa43-a57bba8846b2.jpg?v=1719446766","variant_ids":[45741419233499,45741419266267,45741419299035,45741419331803,45741419364571,45741419397339]},"available":true,"name":"Promaster High Roof Interior Framing Support System for Vent Fans - 159 Extended, Bay 7","public_title":"159 Extended, Bay 7","options":["159 Extended, Bay 7"],"price":8500,"weight":1361,"compare_at_price":null,"inventory_management":"shopify","barcode":"Does not apply","featured_media":{"alt":"Promaster Interior Framing Support System for Fans or AC units","id":34265351160027,"position":1,"preview_image":{"aspect_ratio":1.687,"height":741,"width":1250,"src":"\/\/diyvan.com\/cdn\/shop\/files\/57_a205aeda-176c-4c84-aa43-a57bba8846b2.jpg?v=1719446766"}},"requires_selling_plan":false,"selling_plan_allocations":[],"quantity_rule":{"min":1,"max":null,"increment":1}}]